欢迎交流🤣🤣
镜像源
ubuntu20.04 iso下载地址
1 https://mirrors.tuna.tsinghua.edu.cn/ubuntu-releases/20.04/ubuntu-20.04.6-live-server-amd64.iso
其他版本的下载地址
Index of /ubuntu-releases/ | 清华大学开源软件镜像站 | Tsinghua Open Source Mirror
Python
1
2
3
4
5
6
7
8
# 清华源 pip config set global.index-url https://pypi.tuna.tsinghua.edu.cn/simple # 阿里源 pip config set global.index-url https://mirrors.aliyun.com/pypi/simple/ # 腾讯源 pip config set global.index-url http://mirrors.cloud.tencent.com/pypi/simple # 豆瓣源 pip config set global.index-url http://pypi.douban.com/simple/# 换回默认源pip config unset global.index-url
生成项目所需要的各种包
安装pipreqs:
进入项目主要目录:
生成requirement.txt
1
2
3
4
import osproxy_url = 'http://hinas-v4.ninglang.top:789o' os.environ['HTTP_PROXY' ] = proxy_url os.environ['HTTPS_PROXY' ] = proxy_url
可以直接设置成模块,以便直接引入
1
2
3
4
5
6
7
8
9
10
import osdef set_proxy (): proxy_url = 'http://hinas-v4.ninglang.top:7891' os.environ['HTTP_PROXY' ] = proxy_url os.environ['HTTPS_PROXY' ] = proxy_url print (f"Proxy set to {proxy_url} " ) def unset_proxy (): os.environ.pop('HTTP_PROXY' , None ) os.environ.pop('HTTPS_PROXY' , None )
Torch下载换源
如下载一个cuda11的版本
1 pip install torch torchvision torchaudio --index-url https://download.pytorch.org/whl/cu118
现在可以使用,不建议在安装torch时候使用uv,实测比较慢
1 pip install torch torchvision torchaudio --index-url https://mirrors.nju.edu.cn/pytorch/whl/cu118
在性能有限的机器上安装python
这里的性能主要是只空间有限,毕竟现在硬盘很贵,这个适合在debian或者ubuntu的docker版本中安装,包含独立的python3.10,pip,uv。不依赖miniconda之类的
1
2
3
4
5
6
7
8
9
10
11
12
13
cd /opt && \wget https://github.com/astral-sh/python-build-standalone/releases/download/20250409/cpython-3.10.17+20250409-x86_64-unknown-linux-gnu-install_only_stripped.tar.gz && \ tar -xzf cpython-3.10.17+20250409-x86_64-unknown-linux-gnu-install_only_stripped.tar.gz && \ mv python python-3.10.17 && \rm cpython-3.10.17+20250409-x86_64-unknown-linux-gnu-install_only_stripped.tar.gz && \wget -O /tmp/uv_install.sh https://astral.sh/uv/install.sh && \ sh /tmp/uv_install.sh && \ rm -f /tmp/uv_install.sh && \echo -e "\n# Python 3.10 + uv\nexport PATH=/opt/python-3.10.17/bin:\$HOME/.local/bin:\$PATH" >> ~/.bashrc
Docker
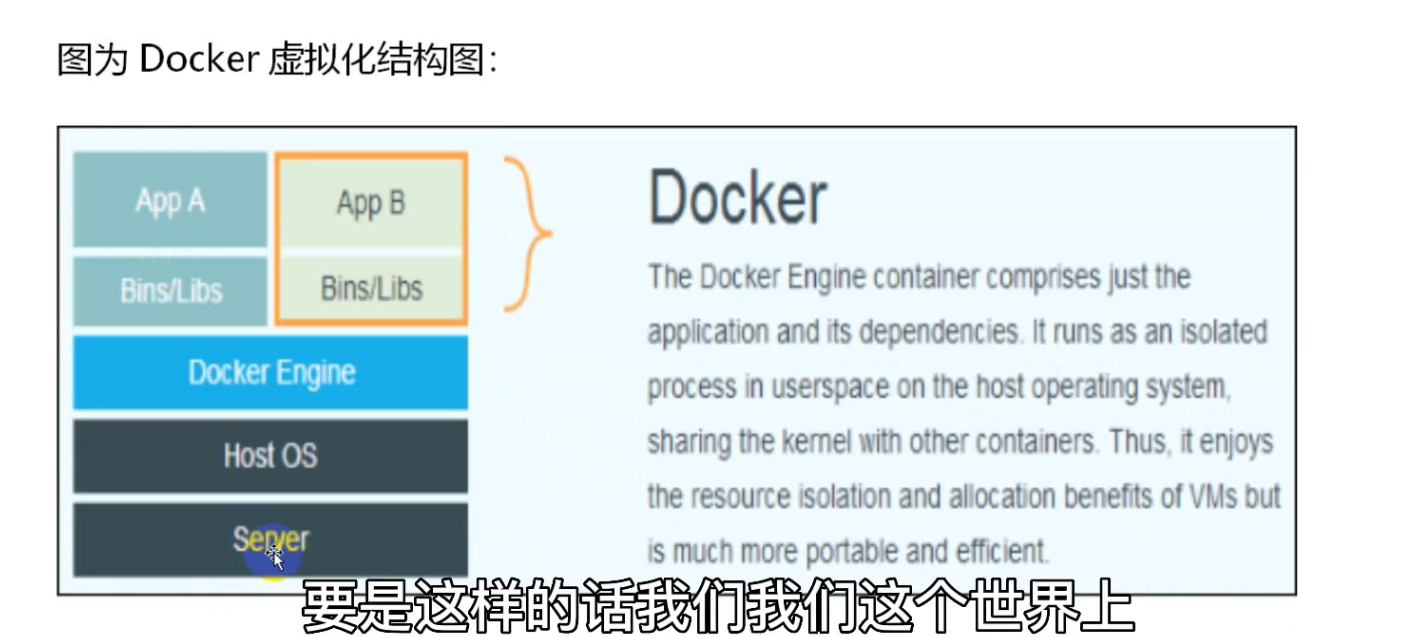
虚拟化技术意义,主要是为了最大化的利用高配硬件设备的资源,提高物理机资源 利用率 ,可以实现应用程序、软件服务进程资源隔离 .
image-20231125161329086
创建Docker程序部署目录:/usr/local/docker/;
docker 安装(阿里云)
参考文献ubuntu 安装 docker详细教程-CSDN博客 。其中选择阿里云下载的docker,自带docker-compose
安装依赖
1 sudo apt install apt-transport-https ca-certificates curl software-properties-common
添加docker 官方GPG密钥
1 curl -fsSL https://download.docker.com/linux/ubuntu/gpg | sudo apt-key add -
添加docker 的APT源,其中arch=amd64根据构架来选 ,这里安装的是阿里云云snap的包,后期设置daemon.json时需要格外注意
1 sudo add-apt-repository "deb [arch=amd64] https://mirrors.aliyun.com/docker-ce/linux/ubuntu $(lsb_release -cs) stable"
docker安装compose
执行如下代码换源
1 2 3 4 5 6 7 8 9 10 11 12 13 sudo apt-get updatesudo apt-get install ca-certificates curlsudo install -m 0755 -d /etc/apt/keyringssudo curl -fsSL https://download.docker.com/linux/ubuntu/gpg -o /etc/apt/keyrings/docker.ascsudo chmod a+r /etc/apt/keyrings/docker.ascecho \ "deb [arch=$(dpkg --print-architecture) signed-by=/etc/apt/keyrings/docker.asc] https://download.docker.com/linux/ubuntu \ $(. /etc/os-release && echo "${UBUNTU_CODENAME:-$VERSION_CODENAME } " ) stable" | \ sudo tee /etc/apt/sources.list.d/docker.list > /dev/null sudo apt-get update
使用如下命令安装插件
1
2
sudo apt-get updatesudo apt-get install docker-compose-plugin
使用教程
1 vi /etc/docker/daemon.json
1
2
3
4
5
6
7
8
9
10
11
12
13
14
15
{ "registry-mirrors" : [ "https://hub.rat.dev" , "https://lynn520.xyz" , "https://doublezonline.cloud" , "https://docker.awsl9527.cn" , "https://docker.1panel.dev" , "https://docker.anyhub.us.kg" , "https://dockerpull.com" , "https://docker.fxxk.dedyn.io" , "https://dhub.kubesre.xyz" , "https://docker.m.daocloud.io" ] }
重启docker
1 sudo service docker restart
对于snap安装的docker包,需要使用
1 sudo snap restart docker
1 2 3 4 5 docker run -itd -p 80:80 --name=web1 --privileged nginx:latest
1 2 docker create "name" docker start "name"
1 docker kill "container name"
1 2 3 4 docker rm "CONTAINER Name" docker rmi "IMAGE ID"
1 2 for i in $(seq 0 99);do docker run -itd-p 80$i :80--name=webos$i --privileged nginx:latest;done
1 docker inspect "CONTAINER ID"
1 docker exec -it "容器名" /bin/bash
查看容器运行情况
使用journalctl -u,后接容器名称
1 journalctl -u school_login.service
Linux
解压tar包
通过Tar工具对其解压缩(-x extract解压,-z gzip压缩格式,-v verbose详细显示,-f file文件属性)
1 tar -xzvf docker-19.03.9.tgz
打开后台终端nohup,后台启动&
1 nphup /usr/local/docker/dockerd &
查看ip地址
观察NAT转发表
1 2 iptables -t nat -L -n --line-numbers
PATH
先将换行符EOF添加到/etc/profile,再添加一行export PATH=\$PATH:/usr/local/docker/到下面,将/usr/local/docker/添加到PATH中去。
1 2 3 cat >>/etc/profile<<EOF export PATH=\$PATH:/usr/local/docker/ EOF
1 2 3 4 export PATH=/home/ninglang/.local/bin
进程
查看进程
设置脚本自启动
修改/etc/rc.local文件,在其中加入自己想要执行的命令
1 2 3 4 5 6 7 8 9 10 11 #!/bin/bash python3 -u /home/ninglang/NJUlogin-main/NJUlogin/school_login.py >/home/ninglang/NJUlogin-main/NJUlogin/school_login.log 2>&1 &
设置静态ip(针对Ubuntu18以上)
进入/etc/netplan/目录下,查看其中的yaml文件,对其进行修改,,修改文件如下,主要设置ip和网关,切记,网关务必正确 .ens33也需要根据linux的情况来配置
1 2 3 4 5 6 7 8 9 10 11 12 network: version: 2 ethernets: ens33: dhcp4: no addresses: - 192.168 .174 .129 /24 gateway4: 192.168 .174 .2 nameservers: addresses: - 114.114 .114 .114 - 119.29 .29 .29
多行输入至文件
追加wireguard的配置文件可以如下这样,其中,需要追加的内容为
1 2 3 4 5 6 [Peer] PublicKey = Nu/4qEyfq7jcmjEp4s6/RA2HGEEg3GcrrD8J+CJGAXI= PresharedKey = c1SmxdtD4V2Q39VqcP9TSWuNFOL0MAhhE9kB1dciYPY= AllowedIPs = fd23:23:24::14/128, 192.168.54.14/32
追加的Code为
1 2 3 4 5 6 7 8 sudo sh -c "cat <<EOL >> /etc/wireguard/wg0.conf # zt / / Updated: 2024-12-16 03:50:38.073537883 +0000 UTC / Created: 2024-12-16 03:50:38.073537883 +0000 UTC [Peer] PublicKey = Nu/4qEyfq7jcmjEp4s6/RA2HGEEg3GcrrD8J+CJGAXI= PresharedKey = c1SmxdtD4V2Q39VqcP9TSWuNFOL0MAhhE9kB1dciYPY= AllowedIPs = fd23:23:24::14/128, 192.168.54.14/32 "
部署seafile+onlyoffice
先下载docker-compose
1 2 3 4 5 6 7 8 9 10 11 12 13 14 15 16 17 18 19 20 21 22 23 24 25 26 27 28 29 30 31 32 33 34 35 36 37 38 39 40 41 42 43 44 45 46 47 48 49 50 51 52 53 54 55 56 57 58 59 60 61 62 63 64 65 66 67 68 69 70 71 version: "3" services: office-preview: image: seafileltd/office-preview:latest container_name: seafile-office-preview ports: - "8086:8089" command : bash start.sh volumes: - ./opt/office-preview/shared:/shared db: image: mariadb:10.11 container_name: seafile-mysql environment: - MYSQL_ROOT_PASSWORD=db_dev - MYSQL_LOG_CONSOLE=true volumes: - ./opt/seafile-mysql/db:/var/lib/mysql networks: - seafile-net memcached: image: memcached:1.6 container_name: seafile-memcached entrypoint: memcached -m 256 networks: - seafile-net onlyoffice: image: onlyoffice/documentserver container_name: onlyoffice environment: - JWT_SECRET=seafile123 - JWT_ENABLED=true - JWT_HEADER=Authorization - JWT_IN_BODY=true ports: - "8080:80" volumes: - ./opt/seafile-onlyoffice/log:/var/log/onlyoffice - ./opt/seafile-onlyoffice/data:/var/www/onlyoffice/Data - ./opt/seafile-onlyoffice/lib:/var/lib/onlyoffice - ./opt/seafile-onlyoffice/db:/var/lib/postgresql networks: - seafile-net seafile: image: seafileltd/seafile-mc:latest container_name: seafile ports: - "8089:80" - "8090:8080" volumes: - ./opt/seafile-data:/shared environment: - DB_HOST=db - DB_ROOT_PASSWD=db_dev - SEAFILE_ADMIN_EMAIL=ninglang@qq.com - SEAFILE_ADMIN_PASSWORD=3761234yzm - SEAFILE_SERVER_LETSENCRYPT=false - SEAFILE_SERVER_HOSTNAME=3865.ninglang.fun:8089 depends_on: - db - memcached networks: - seafile-net networks: seafile-net:
修改seahub
1 2 3 4 5 6 7 docker exec -it seafile /bin/bash cd confvim seahub_settings.py
追加seahub_settings.py内容如下
1 2 3 4 5 6 7 8 ENABLE_ONLYOFFICE = True VERIFY_ONLYOFFICE_CERTIFICATE = True ONLYOFFICE_JWT_SECRET = 'seafile123' ONLYOFFICE_APIJS_URL = 'http://3865.ninglang.fun:8080/web-apps/apps/api/documents/api.js' ONLYOFFICE_FILE_EXTENSION = ('doc' , 'docx' , 'ppt' , 'pptx' , 'xls' , 'xlsx' , 'odt' , 'fodt' , 'odp' , 'fodp' , 'ods' , 'fods' ) ONLYOFFICE_EDIT_FILE_EXTENSION = ('docx' , 'pptx' , 'xlsx' )
3.进入onlyoffice修改etc/onlyoffice/documentserver/default.json,修改如下
1 2 3 4 5 6 "rejectUnauthorized" : false "allowPrivateIPAddress" : true , "allowMetaIPAddress" : true
重启docker
部署专业版seafile
docker compose
docker-compose如下
1 2 3 4 5 6 7 8 9 10 11 12 13 14 15 16 17 18 19 20 21 22 23 24 25 26 27 28 29 30 31 32 33 34 35 36 37 38 39 40 41 42 43 44 45 46 47 48 49 50 51 52 53 54 55 56 57 58 59 60 61 62 63 64 65 66 67 68 69 70 71 72 73 74 75 76 77 78 79 80 81 82 83 84 85 86 87 88 89 90 91 92 version: '2.0' services: db: image: mariadb:10.5 container_name: seafile-mysql environment: - MYSQL_ROOT_PASSWORD=db_dev - MYSQL_LOG_CONSOLE=true volumes: - ./opt/seafile-mysql/db:/var/lib/mysql networks: - seafile-net restart: always memcached: image: memcached:1.6 container_name: seafile-memcached entrypoint: memcached -m 256 networks: - seafile-net restart: always elasticsearch: image: seafileltd/elasticsearch-with-ik:5.6.16 container_name: seafile-elasticsearch environment: - discovery.type=single-node - bootstrap.memory_lock=true - "ES_JAVA_OPTS=-Xms1g -Xmx1g" ulimits: memlock: soft: -1 hard: -1 mem_limit: 2g volumes: - ./opt/seafile-elasticsearch/data:/usr/share/elasticsearch/data networks: - seafile-net restart: always onlyoffice: image: lovechen/seafile-pro-mc:onlyoffice-ce-7.0.0.132 container_name: onlyoffice volumes: - ./opt/seafile-onlyoffice/log:/var/log/onlyoffice - ./opt/seafile-onlyoffice/data:/var/www/onlyoffice/Data - ./opt/seafile-onlyoffice/lib:/var/lib/onlyoffice - ./opt/seafile-onlyoffice/db:/var/lib/postgresql - ./opt/seafile-onlyoffice/fonts:/usr/share/fonts/ environment: - JWT_ENABLED=true - JWT_SECRET=seafile123 depends_on: - seafile networks: - seafile-net restart: always seafile: image: lovechen/seafile-pro-mc:core-sp-8.0.16 container_name: seafile ports: - "8081:80" volumes: - ./opt/seafile-data:/shared environment: - DB_HOST=db - DB_ROOT_PASSWD=db_dev - SEAFILE_ADMIN_EMAIL= - SEAFILE_ADMIN_PASSWORD= - SEAFILE_SERVER_LETSENCRYPT=false depends_on: - db - memcached - elasticsearch networks: - seafile-net restart: always networks: seafile-net: driver: bridge ipam: driver: default config: - subnet: 172.28 .0 .0 /16 gateway: 172.28 .0 .1
Nginx配置
1 2 3 4 5 6 7 8 9 10 11 12 13 14 15 16 17 18 19 20 21 22 23 24 25 26 27 28 29 30 31 32 33 34 35 36 37 38 39 40 41 42 43 44 45 46 47 48 49 50 51 52 53 54 55 56 57 58 59 60 61 62 63 64 65 66 67 68 69 70 71 72 73 74 75 76 77 78 79 80 81 82 83 84 85 86 87 88 89 90 91 92 93 94 95 96 97 98 99 100 101 server { listen 80; client_max_body_size 10m; location / { proxy_pass http://127.0.0.1:8000/; proxy_read_timeout 310s; proxy_set_header Host $host ; proxy_set_header Forwarded "for=$remote_addr ;proto=$scheme " ; proxy_set_header X-Forwarded-For $proxy_add_x_forwarded_for ; proxy_set_header X-Forwarded-Proto $scheme ; proxy_set_header X-Real-IP $remote_addr ; proxy_set_header Connection "" ; proxy_http_version 1.1; client_max_body_size 0; access_log /var/log/nginx/seahub.access.log seafileformat; error_log /var/log/nginx/seahub.error.log; } location /seafhttp { rewrite ^/seafhttp(.*)$ $1 break ; proxy_pass http://127.0.0.1:8082; proxy_set_header X-Forwarded-For $proxy_add_x_forwarded_for ; client_max_body_size 0; proxy_connect_timeout 36000s; proxy_read_timeout 36000s; proxy_request_buffering off; access_log /var/log/nginx/seafhttp.access.log seafileformat; error_log /var/log/nginx/seafhttp.error.log; } location /seafdav { proxy_pass http://127.0.0.1:8080; proxy_set_header Host $host ; proxy_set_header X-Real-IP $remote_addr ; proxy_set_header X-Forwarded-For $proxy_add_x_forwarded_for ; proxy_set_header X-Forwarded-Host $server_name ; proxy_set_header X-Forwarded-Proto $scheme ; proxy_read_timeout 1200s; client_max_body_size 0; access_log /var/log/nginx/seafdav.access.log seafileformat; error_log /var/log/nginx/seafdav.error.log; } location /media { root /opt/seafile/seafile-server-latest/seahub; } location /.well-known/acme-challenge/ { alias /var/www/challenges/; try_files $uri =404; } location /loveoffice/ { proxy_pass http://onlyoffice/; proxy_http_version 1.1; proxy_read_timeout 36000s; proxy_connect_timeout 36000s; client_max_body_size 0; proxy_request_buffering off; proxy_set_header Upgrade $http_upgrade ; proxy_set_header Connection $proxy_connection ; proxy_set_header X-Forwarded-Host $the_host :7012/loveoffice/; proxy_set_header X-Forwarded-Proto $the_scheme ; proxy_set_header X-Forwarded-For $proxy_add_x_forwarded_for ; } } map $upstream_http_strict_transport_security $strict_transport_security { '' max-age=31536000; } map $http_upgrade $connection_upgrade { default upgrade; '' close; } map $http_x_forwarded_proto $the_scheme { default $http_x_forwarded_proto ; '' $scheme ; } map $http_x_forwarded_host $the_host { default $http_x_forwarded_host ; '' $host ; } map $http_upgrade $proxy_connection { default upgrade; '' close; }
seafile-hub设置
1 2 3 4 5 6 7 8 9 10 11 12 13 14 15 16 17 18 19 20 21 22 23 24 25 26 27 28 29 30 31 32 33 34 SECRET_KEY = "b'*5yft$%&22b(2*y(tgutd2mj+-@1_*v__#%&tl%!8oo5x3p^bw'" DATABASES = { 'default' : { 'ENGINE' : 'django.db.backends.mysql' , 'NAME' : 'seahub_db' , 'USER' : 'seafile' , 'PASSWORD' : '93d8c294-b6ff-4b33-a928-275db63c246a' , 'HOST' : 'db' , 'PORT' : '3306' } } CACHES = { 'default' : { 'BACKEND' : 'django_pylibmc.memcached.PyLibMCCache' , 'LOCATION' : 'memcached:11211' , }, 'locmem' : { 'BACKEND' : 'django.core.cache.backends.locmem.LocMemCache' , }, } COMPRESS_CACHE_BACKEND = 'locmem' TIME_ZONE = 'Asia/Shanghai' FILE_SERVER_ROOT = "https://seafile.ninglang.top:7012/seafhttp" ENABLE_ONLYOFFICE = 'True' VERIFY_ONLYOFFICE_CERTIFICATE = 'True' ONLYOFFICE_APIJS_URL = "https://seafile.ninglang.top:7012/loveoffice/web-apps/apps/api/documents/api.js" ONLYOFFICE_FILE_EXTENSION = ('doc' , 'docx' , 'ppt' , 'pptx' , 'xls' , 'xlsx' , 'odt' , 'fodt' , 'odp' , 'fodp' , 'ods' , 'fods' ) ONLYOFFICE_EDIT_FILE_EXTENSION = ('doc' , 'docx' , 'ppt' , 'pptx' , 'xls' , 'xlsx' , 'odt' , 'fodt' , 'odp' , 'fodp' , 'ods' , 'fods' ) ONLYOFFICE_JWT_SECRET = 'seafile123' OFFICE_CONVERTOR_ROOT = 'http://127.0.0.1:6000/'
修改权限
解决头像无法修改的问题
1 2 cd /opt/seafile/seafile-server-latest/seahub/media/avatarssudo chmod -R 755 ./0
不使用OnlyOffice
由于使用docker部署的镜像,要求onlyoffice可以访问到seafile的内容,但是由于使用的ipv6作为域名,因此会直接导致onlyoffice失败,故对于docker部署的套件,应该放弃onlyoffice(如果有v4就没关系)
docker-compose
1 2 3 4 5 6 7 8 9 10 11 12 13 14 15 16 17 18 19 20 21 22 23 24 25 26 27 28 29 30 31 32 33 34 35 36 37 38 39 40 41 42 43 44 45 46 47 48 49 50 51 52 53 54 55 56 57 58 59 60 61 62 63 64 65 66 67 68 69 70 71 version: '2.0' services: db: image: mariadb:10.5 container_name: seafile-mysql environment: - MYSQL_ROOT_PASSWORD=db_dev - MYSQL_LOG_CONSOLE=true volumes: - ./opt/seafile-mysql/db:/var/lib/mysql networks: - seafile-net restart: always memcached: image: memcached:1.6 container_name: seafile-memcached entrypoint: memcached -m 256 networks: - seafile-net restart: always elasticsearch: image: seafileltd/elasticsearch-with-ik:5.6.16 container_name: seafile-elasticsearch environment: - discovery.type=single-node - bootstrap.memory_lock=true - "ES_JAVA_OPTS=-Xms1g -Xmx1g" ulimits: memlock: soft: -1 hard: -1 mem_limit: 2g volumes: - ./opt/seafile-elasticsearch/data:/usr/share/elasticsearch/data networks: - seafile-net restart: always seafile: image: lovechen/seafile-pro-mc:core-sp-8.0.16 container_name: seafile ports: - "8081:80" volumes: - ./opt/seafile-data:/shared environment: - DB_HOST=db - DB_ROOT_PASSWD=db_dev - SEAFILE_ADMIN_EMAIL=ninglang@qq.com - SEAFILE_ADMIN_PASSWORD=3761234yzm - SEAFILE_SERVER_LETSENCRYPT=false depends_on: - db - memcached - elasticsearch networks: - seafile-net restart: always networks: seafile-net: driver: bridge ipam: driver: default config: - subnet: 172.28.0.0/16 gateway: 172.28.0.1
nginx
务必注释如下loveoffice,否则nginx无法启动,导致无法进入seafile
1 2 3 4 5 6 7 8 9 10 11 12 13 14 15 16 17 18 19 20 21 22 23
seahub设置
1 2 3 4 5 6 7 8 9 10 COMPRESS_CACHE_BACKEND = 'locmem' TIME_ZONE = 'Asia/Shanghai' FILE_SERVER_ROOT = "https://seafile.ninglang.top:7012/seafhttp" OFFICE_CONVERTOR_ROOT = 'http://127.0.0.1:6000/'
NPS设置
由于使用wsl2或者一些内网虚拟的环境的时候,这些端口并没有映射,导致在实现生产的时候如果这个端口没有在外部那么不好调试,除此之外,个人感觉vscode的端口转发比较好用,所以需要一个可以在server端指定的软件,这个很关键,因为据我所知:FRP 不支持在server指定,必须要在frpc端指定,所以需要用到nps和npc
NPS
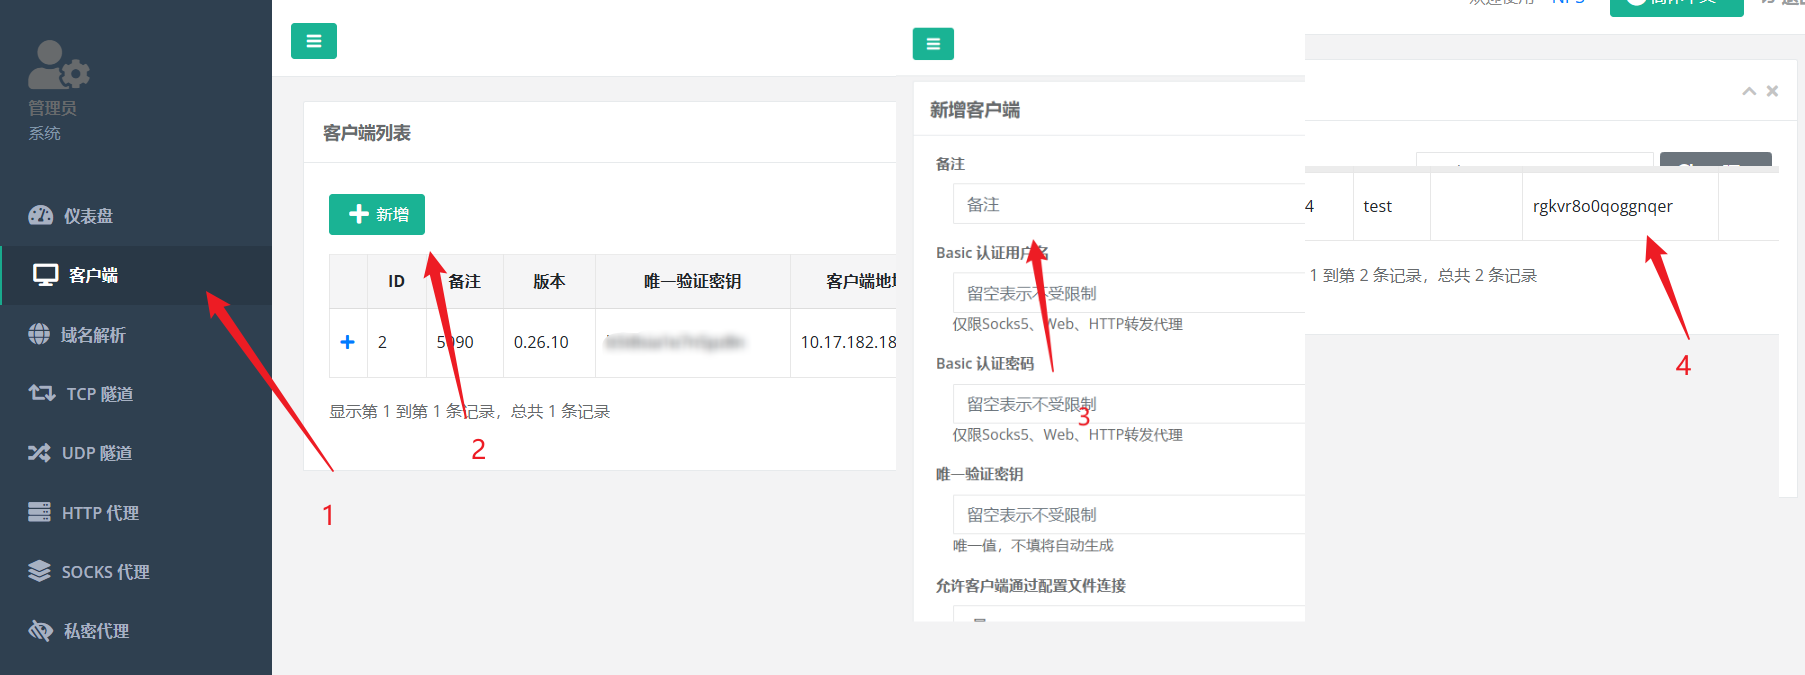
NPS是server端,需要修改conf配置,这里我只说明需要修改哪些部分,按照图中新建,按照图片的顺序,找到vKey。
1 2 3 4 5 6 7 web_username = web_password = web_port = xin bridge_port =
image-20251106172541719
创建一个systemctl如下
1 2 3 4 5 6 7 8 9 10 11 12 13 14 [Unit] Description=npc-go After=network.target [Service] Type=simple Environment="PATH=/usr/local/sbin:/usr/local/bin:/usr/sbin:/usr/bin:/usr/local/cuda/bin:/usr/lib/wsl/lib/" WorkingDirectory=/root/nps/ ExecStart=/root/nps/nps Restart=always RestartSec=5 User=root [Install] WantedBy=multi-user.target
enable,start
1 2 systemctl enable nps-go.service systemctl start nps-go.service
NPC
npc是client端,需要在待内网穿透的机器上进行设置,这里假设是在虚拟机上,首先需要下载npc
1 wget https://github.com/ehang-io/nps/releases/download/v0.26.10/linux_amd64_client.tar.gz
解压之后进入,到了conf目录,粘贴如如下配置,其中主要是vkey
1 2 3 4 5 6 7 8 9 10 11 12 13 14 15 16 17 18 19 20 21 22 23 24 [common] server_addr=hinas-v4.ninglang.top:8024 conn_type=tcp vkey=xxxx auto_reconnection=true max_conn=1000 flow_limit=1000 rate_limit=1000 basic_username=11 basic_password=3 web_username=user web_password=1234 crypt=true compress=true disconnect_timeout=60 [health_check_test1] health_check_timeout=1 health_check_max_failed=3 health_check_interval=1 health_http_url=/ health_check_type=http health_check_target=127.0.0.1:8083,127.0.0.1:8082
创建systemctl,enable 和 start
1 2 3 4 5 6 7 8 9 10 11 12 13 14 [Unit] Description=npc-go After=network.target [Service] Type=simple Environment="PATH=/usr/local/sbin:/usr/local/bin:/usr/sbin:/usr/bin:/usr/local/cuda/bin:/usr/lib/wsl/lib/" WorkingDirectory=/home/yzmin/npc ExecStart=/home/yzmin/npc/npc Restart=always RestartSec=5 User=root [Install] WantedBy=multi-user.target
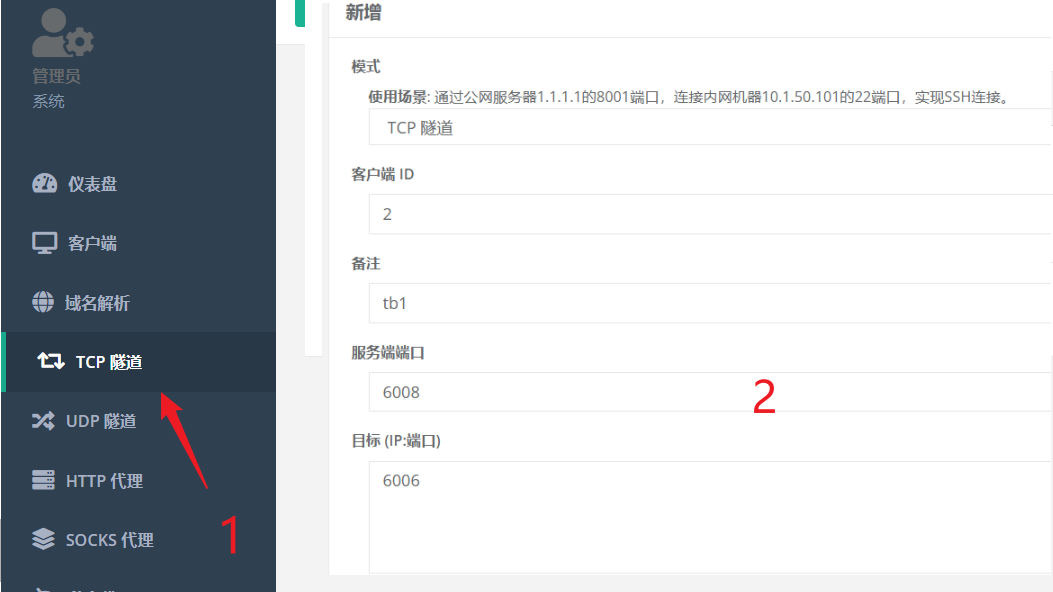
添加想要转发的端口
假设client开了一个端口6006(tensorboard)
Servers设置如下图,提交了,即可通过相应的端口查看并且访问
image-20251106173150348
FRP设置
frpc设置
frpc.toml实例文件
1 2 3 4 5 6 7 8 9 10 11 12 13 14 15 16 17 18 serverAddr = "frp.ninglang.fun" serverPort = 7710 user = "huifeidezhizhen" metadatas.token = "hmdd7uXU%HPQ8!d0" [[proxies]] name = "jupyter" type = "tcp" localIP = "127.0.0.1" localPort = 8888 remotePort = 20151 [[proxies]] name = "tiny" type = "tcp" localIP = "127.0.0.1" localPort = 8881 remotePort = 20152
VSCode设置SSH无密码登录
生成ssh,一路回车即可
进入~/.ssh,将公钥内容输出到authorized_keys,下载私钥文件id_rsa,并且改名
1 cat id_rsa.pub >> ./authorized_keys
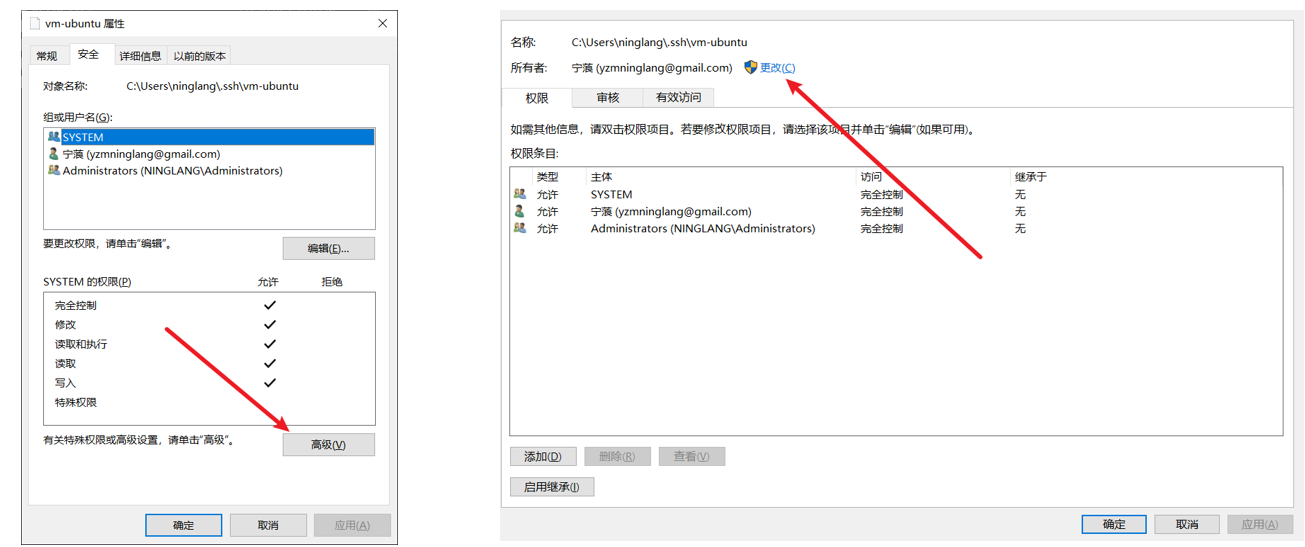
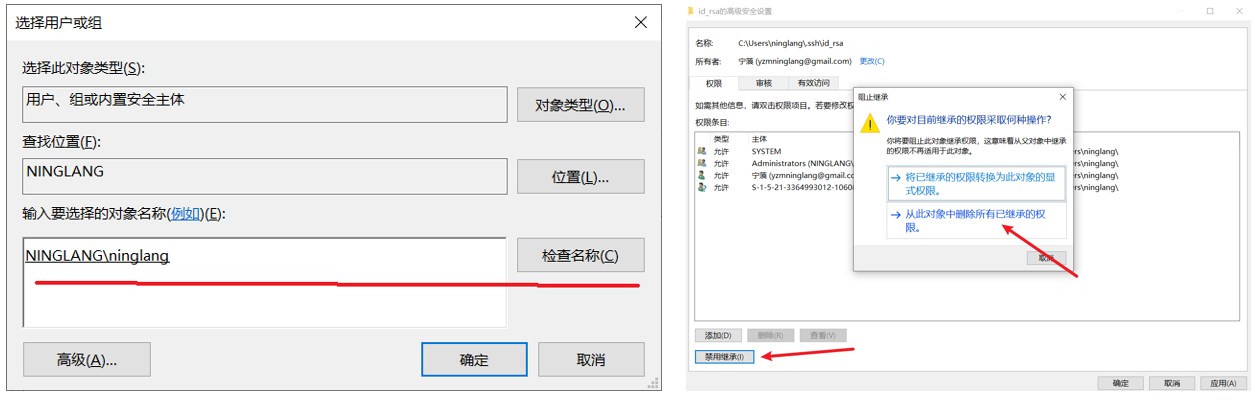
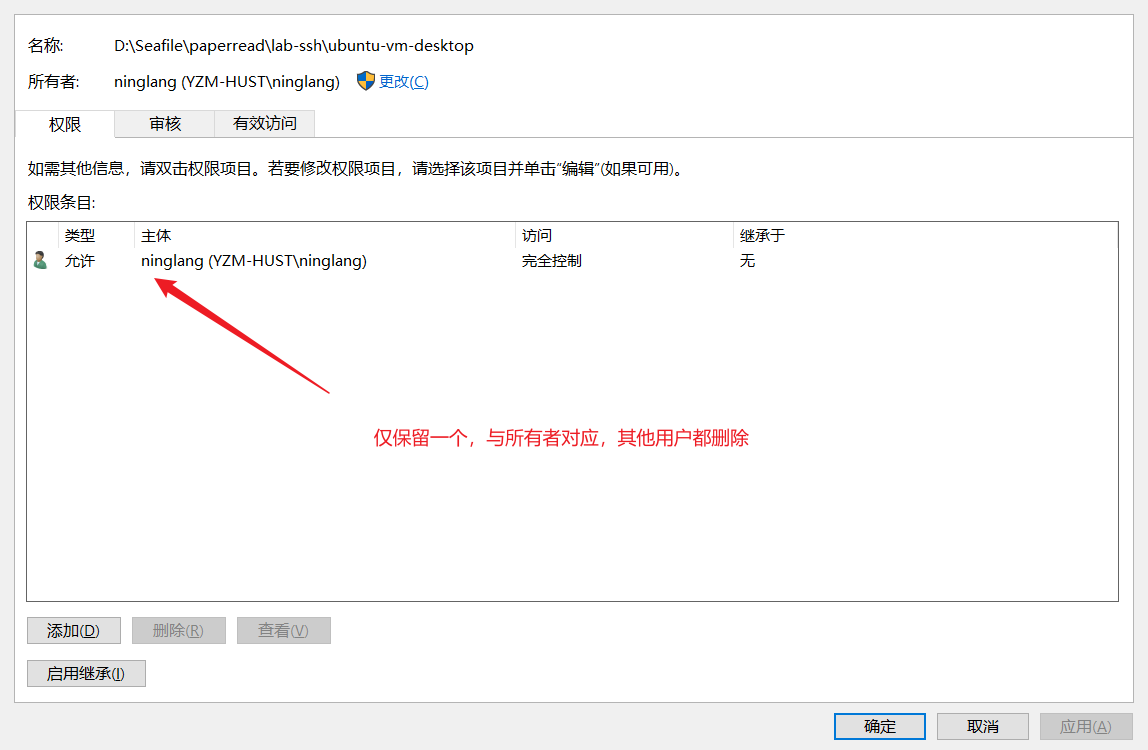
将私钥文件放在C:\Users\ninglang\.ssh\vm-ubuntu,设置该文件的权限具体步骤图1和图2所示
图1
图2
注意,vscode可能依会出现It is required that your private key files are NOT accessible by others.的错误,这个时候需要在最后面删除其他用户的访问权限,仅保存当前用户的访问权限 。
image-20241230144506168
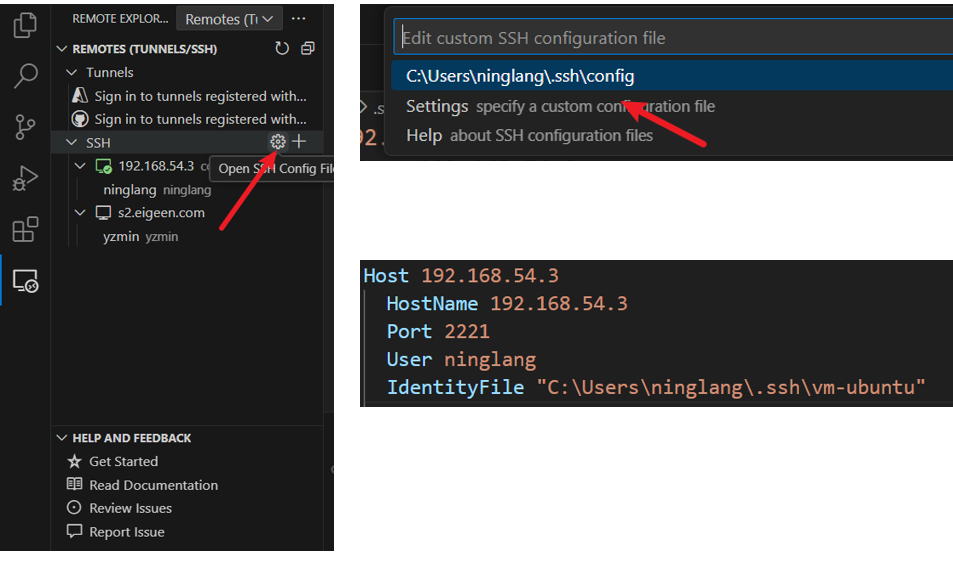
设置完成之后进行保存,打开vscode,按照如下配置信息配置
VScode配置
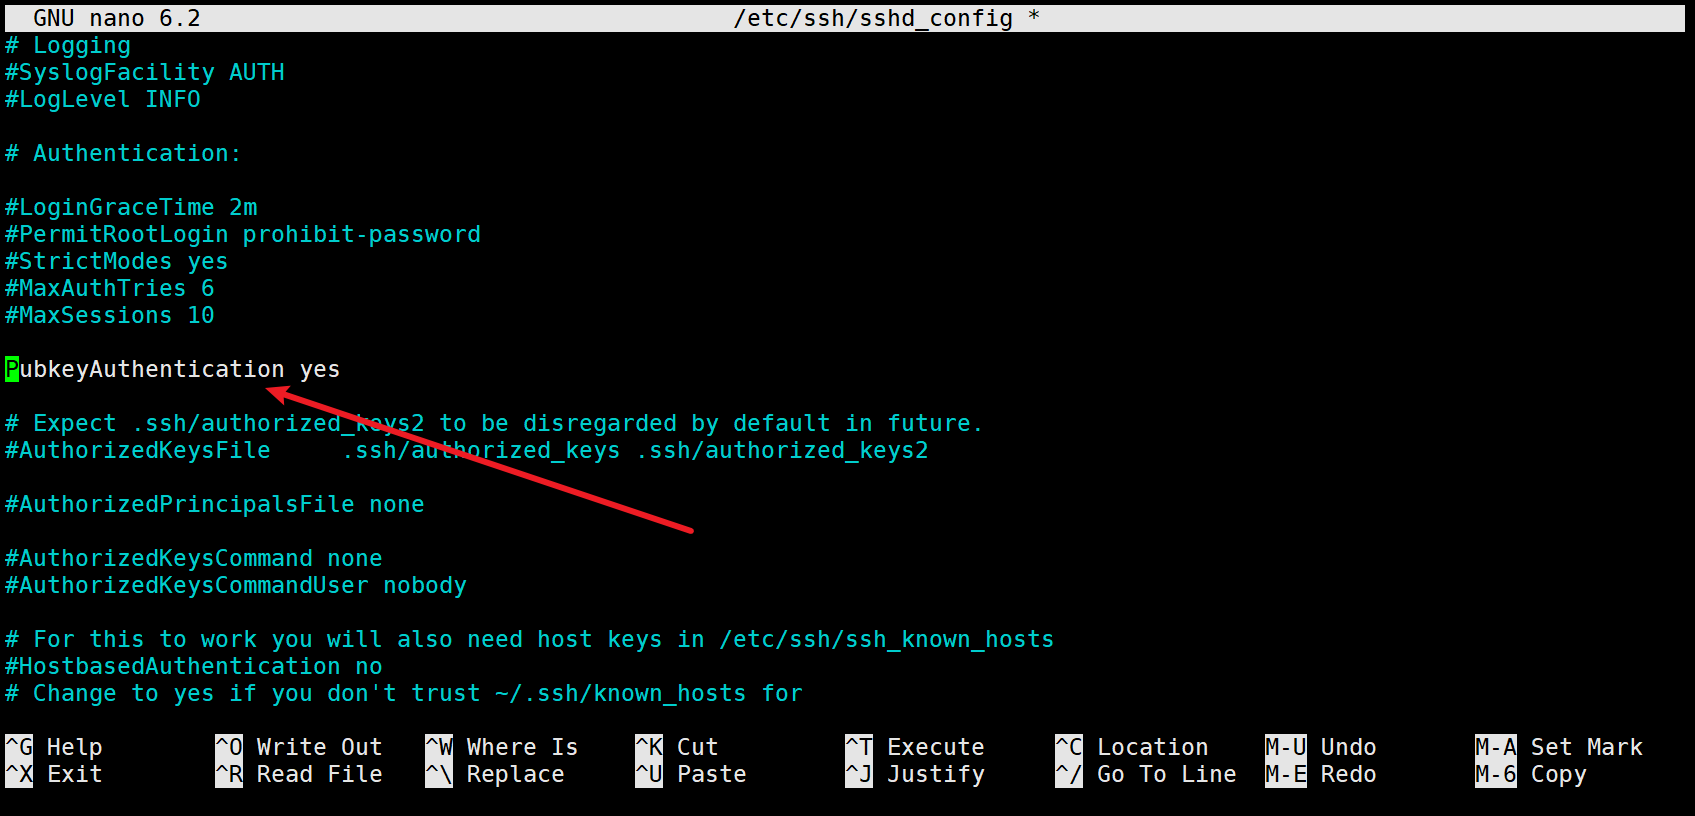
除此之外,需要在Ubuntu的机器中编辑/etc/ssh/sshd_config,设置如下图的参数
image-20241228145249122
Webshare共享文件
下载文件之后,放进特定文件夹,如/home/yzmin/software/,然后编写如下脚本,命名为ws
1 2 3 4 5 6 7 8 9 10 11 12 13 14 15 16 #!/bin/bash WEBSHARE_HOME="/home/yzmin/software/" if [ ! -d "$WEBSHARE_HOME " ]; then echo "Error: Webshare directory not found at $WEBSHARE_HOME ." exit 1 fi "$WEBSHARE_HOME /webshare" "serve"
然后将该路径添加到path
添加如下语句
1 export PATH=$PATH :/home/yzmin/software
现在在任意地方执行ws都可以实现文件共享
Git
如果没有特殊情况的话,git务必走ssh协议,而不是https协议,否则大概率每次都要登录
git 设置名称和邮箱(已经设置好ssh的情况下)
1 2 git config --global user.name ninglang git config --global user.email yzmninglang@gmail.com
git拉取特定分支
1 git clone -b Calendar git@github.com:yzmninglang/Todo-web.git
git打包
git archive <分支名称> 格式 输出路径
1 git archive master --format=tar.gz --output=/home/raymond/work/master.tar.gz
git创建,并继承当前分支
使用git checkout -b "新分支名"来创建新的分支,并自动切换到新的分支
git push至远端分支
设置远端地址 git remote add origin 远端地址
1 git remote add origin git@github.com:yzmninglang/DPFL.git
推送至远端分支,将当前分支 (务必记得切换到需要推送的分支)推送到远端的某个分支:git push -u origin 远端分支名,如下表示将当前的master分支推送到远程的master
1 git push -u origin master
如何将本地的master推送到远程Calendar,可以采用如下方式
1 git remote add origin git@github.com:yzmninglang/Todo-web.git
1 git push -u --set-upstream origin master:Calendar
git如何设置gitignore
新建.gitgnore文件
添加如下代码排除所有工程文件
1 2 3 4 5 6 7 8 9 10 11 12 13 14 15 16 17 18 19 20 21 22 23 24 25 * !*/ !.gitignore !*.uvprojx !*.c !*.cpp !*.h
git创建空白分支并push到github
参考文章:如何快速在 Git 中创建一个空分支(孤立分支) - 知乎
创建空白分支并切换至新分支:git checkout --orphan "分支名"
1 git checkout --orphan linux
清除新分支的所有内容:
添加.gitgnore文件,如上
添加代码文件,使用
1 2 git add . git commit -m "Init commit"
推送到远程分支:git push origin "新建分支名"
git合并分支,并解决文件冲突
参考文章:详解Git合并冲突——问题重现、原因及解决 “Automatic merge failed; fix conflicts and then commit the result.“_automatic merge failed; fix conflicts and then com-CSDN博客
合并分支
当前分支为master分支,需要合并dev分支
合并dev分支
如果出现冲突
1 2 3 4 5 6 7 CONFLICT (add/add): Merge conflict in xianyu.py Auto-merging xianyu.py CONFLICT (add/add): Merge conflict in error.txt Auto-merging error.txt CONFLICT (add/add): Merge conflict in data.txt Auto-merging data.txt Automatic merge failed; fix conflicts and then commit the result.
这时有两种选择
打开冲突文件,=======之上是master的分支修改的文件内容。=======git add .,重新提交到缓存区,并且使用git commit -m对修改进行commit即可
退出merge的中间形态放弃本次merge
代理设置
设置代理有时候是必要,但是也不希望系统一启动就是代理,因此可以设置如下:修改~/.bashrc,添加如下代码,这样在下一次需要使用代理的位置可以直接使用了
1 2 3 4 5 6 7 8 9 10 11 proxy export http_proxy="http://hinas-v4.ninglang.top:7891" export https_proxy="http://hinas-v4.ninglang.top:7891" echo "Proxy set to http://hinas-v4.ninglang.top:7891" } unproxy unset http_proxy unset https_proxy echo "Proxy unset." }
使用aria2下载HF的特定模型文件
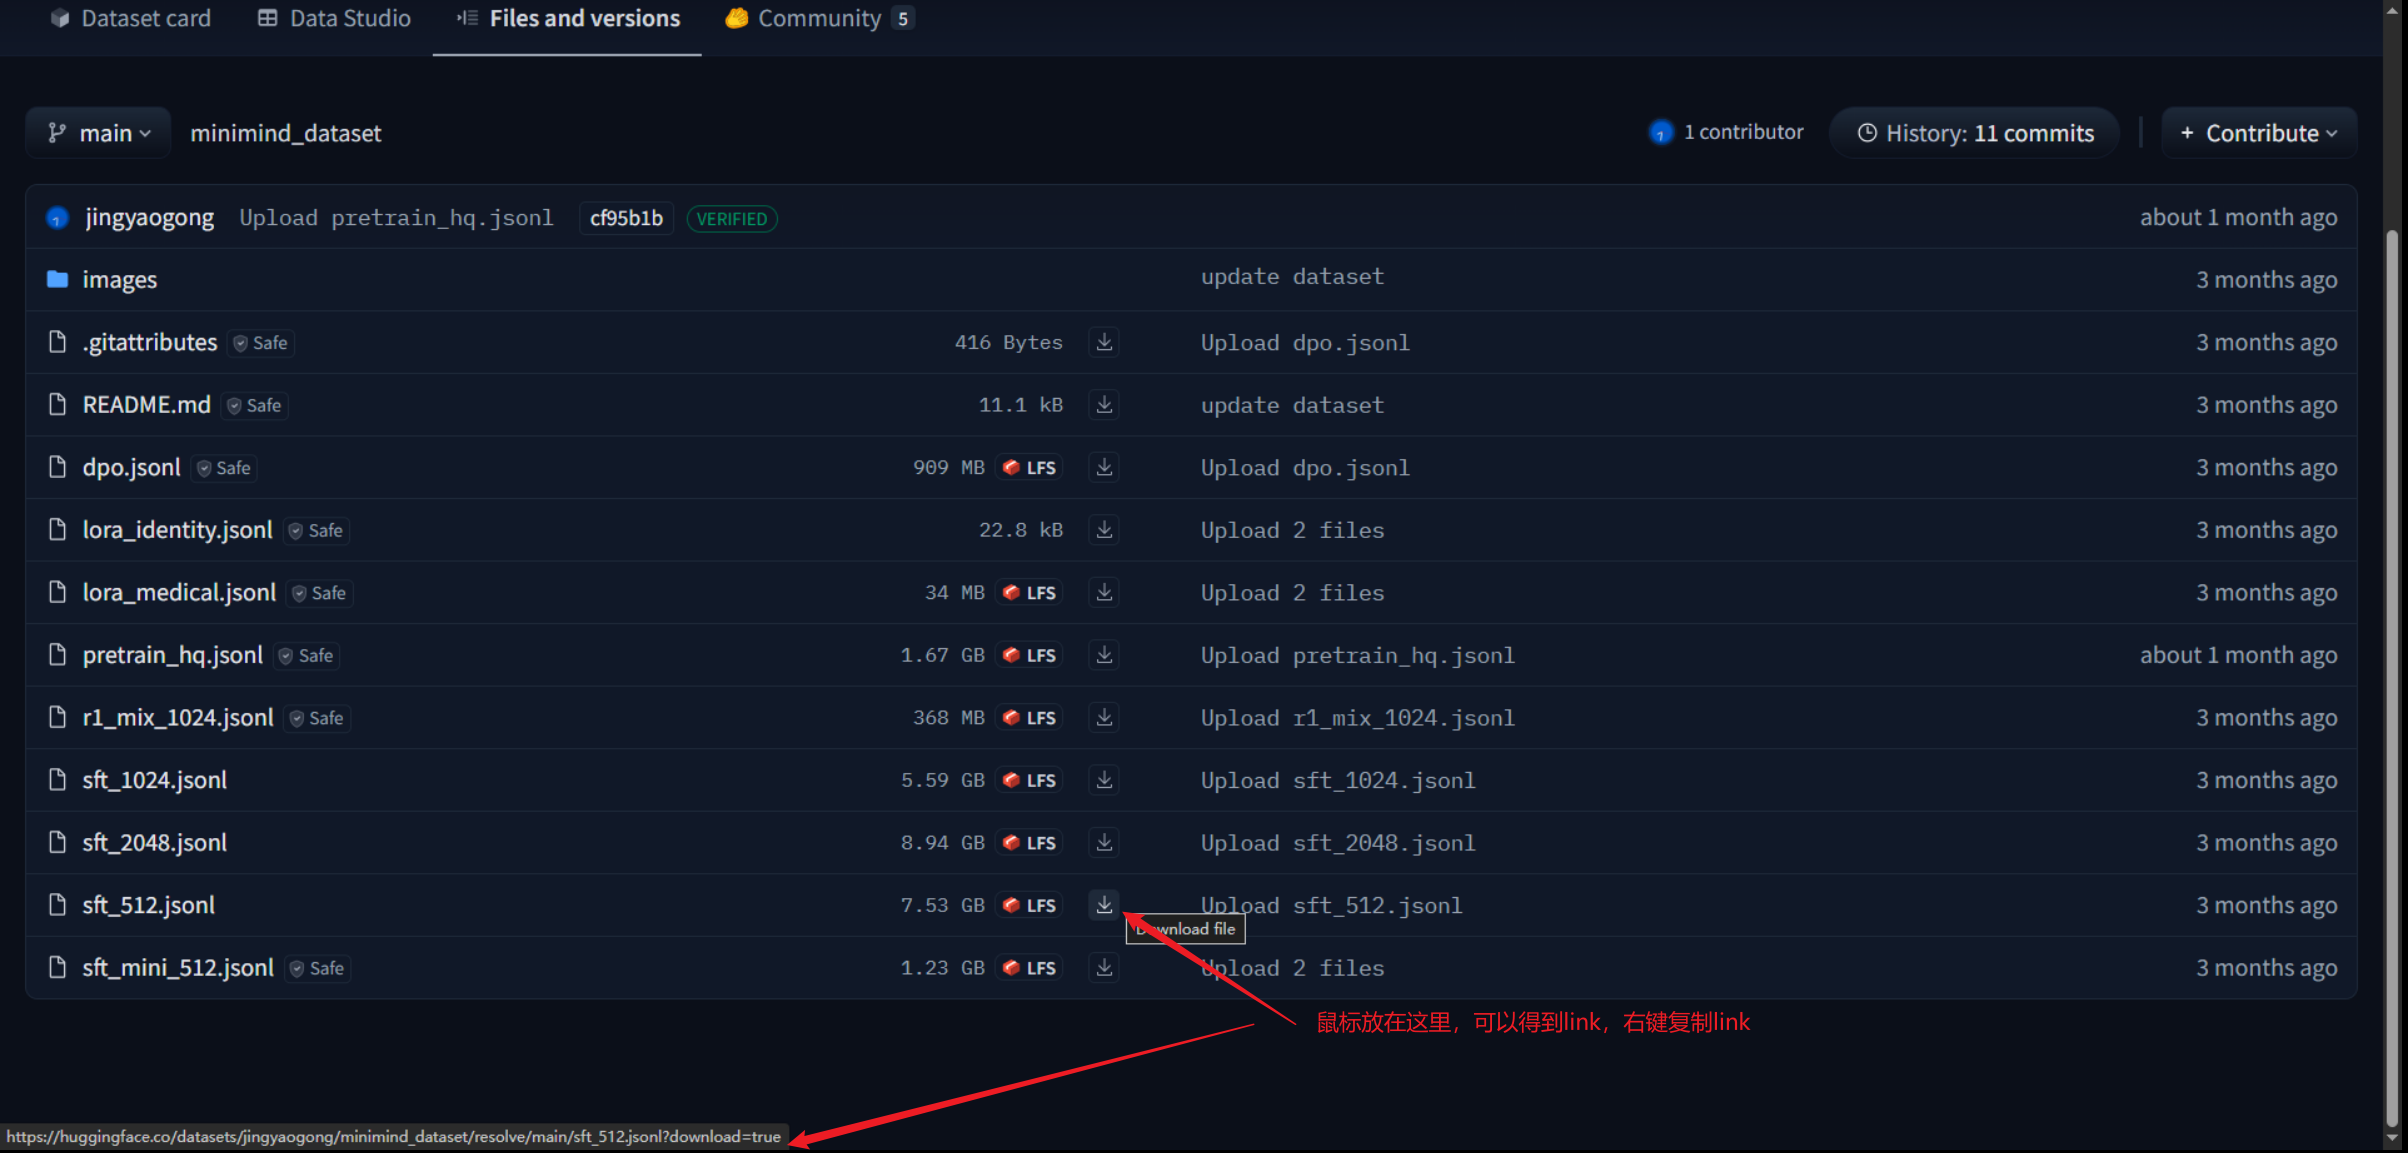
在设置好proxy的情况 下,先按照如图所示获得link,实现的是多线程下载
image-20250526170350988
使用bash命令实现
1 aria2c -c https://huggingface.co/datasets/jingyaogong/minimind_dataset/resolve/main/pretrain_hq.jsonl?download=true
安装Ubuntu22.04设置SSH
如果想要离线安装openssh
安装openssh-sftp-server
下载地址
1 https://mirrors.aliyun.com/ubuntu/pool/main/o/openssh/openssh-sftp-server_8.9p1-3ubuntu0.13_amd64.deb
安装openssh-server
1 https://mirrors.aliyun.com/ubuntu/pool/main/o/openssh/openssh-server_8.9p1-3ubuntu0.13_amd64.deb
安装ssh
1 2 sudo dpkg -i openssh-sftp-server_8.9p1-3ubuntu0.13_amd64.debsudo dpkg -i openssh-server_8.9p1-3ubuntu0.13_amd64.deb
设置默认为bash(对于不会自动读取.bashrc,且无法使用tab的情况)
查看shell的类型
修改默认为Bash
设置sudo免密
1 2 sudo visudo%sudo ALL=(ALL:ALL) NOPASSWD:ALL
针对53端口占用之后如何开启mDNS(仅考虑Ubuntu)
普通DNS和mDNS的差异
普通 DNS(传统的域名解析) UDP/TCP
53 系统的 DNS 客户端、named / dnsmasq / systemd-resolved 等会用这个端口。
mDNS(多播 DNS) UDP
5353 由 avahi-daemon 或 macOS 的 mDNSResponder 负责;仅在本地局域网内广播。
安装方法
安装套件
1 2 sudo apt updatesudo apt install avahi-daemon avahi-utils -y
设置自启动
1 2 sudo systemctl enable avahi-daemonsudo systemctl start avahi-daemon
查看运行状态
1 systemctl status avahi-daemon
查看端口占用情况
1 sudo netstat -ulnp | grep avahi
输出结果
1 2 3 4 udp 0 0 0.0.0.0:47224 0.0.0.0:* 2824758/avahi-daemo udp 0 0 0.0.0.0:5353 0.0.0.0:* 2824758/avahi-daemo udp6 0 0 :::42761 :::* 2824758/avahi-daemo udp6 0 0 :::5353 :::* 2824758/avahi-daemo
硬盘自检
查看所有的硬盘
查看smart信息, sdx表示第几个盘
1 sudo smartctl -t short /dev/sdX
运行彻底自检
1 sudo smartctl -t long /dev/sdX
等到完全运行完成之后,执行
1 sudo smartctl -a /dev/sdX
观察某些的数字是否上升,确定是否是真的损坏(如197和198)
HINAS盒子Reboot之后启动失效的问题
hinas盒子可能出现启动失效,因此建议使用alias来直接取代reboot
1 echo 'alias reboot="shutdown -r now"' >> ~/.bashrc
自建hy2协议帮助使用
主要执行如下
1 wget -O install.sh https://raw.githubusercontent.com/seagullz4/hysteria2/main/install.sh && chmod +x install.sh && bash install.sh
在选择合适的方式,建议安装相关内核,就差不多了,
得到如下的订阅地址
1 hysteria2://voZ6To63xxxxxxx
然后复制到订阅网站中进行转化:使用singbox或者clash-verge都是可以的
安装Fail2ban
FailBan可以实现对SSH、FTP、NGINX暴力破解,短时间内错误N次,则启用IPTABLEs封IP,并且过一段时间自动解封
1 2 3 4 5 sudo apt updatesudo apt install fail2ban -ysudo systemctl start fail2bansudo systemctl enable fail2bansudo systemctl status fail2ban
使用
一般来说说Fail2ban需要设置两个地方 创建过滤器文件(专门用于 hy2 端口扫描)
1 sudo nano /etc/fail2ban/filter.d/hy2-probe.conf
东西让AI去写吧,再写一个 jail(对 hy2 端口启用防护)
1 sudo nano /etc/fail2ban/jail.d/hy2-probe.conf
重启,查看是否Work
1 2 sudo systemctl restart fail2bansudo fail2ban-client status
NM网络管理问题
NetworkManager 是debian的网络管理工具,主要作用如下:网络掉线了 → NM 自动重新连接;你拔网线 → NM 自动修复;WiFi 信号变化 → NM 自动重连
它把所有网络(网卡、WiFi、VPN、桥接、VLAN)的配置集中管理,不用你手动改配置文件。
如何设置
哪些需要使用NM管理?
ethx/enp3s0/eno1 ,wifi,VPN(NM创建)
不能使用NM管理
如何判断是否被管理
1 2 3 4 5 6 7 DEVICE TYPE STATE CONNECTION br-d295b7b2a11e bridge connected br-d295b7b2a11e docker0 bridge connected docker0 tailscale0 tun connected tailscale0 eth0 ethernet connected Ifupdown (eth0) veth* ethernet unmanaged -- wg0 wireguard unmanaged --
“connected” 的含义 ≠ 由 NM 完全管理,需要看CONNECTION,如果出现Ifupdown ,表示/etc/network/interfaces管理,如果是下面的,则是由NM管理
1 2 3 DEVICE TYPE STATE CONNECTION eth0 ethernet connected Wired connection 1 Mywifi MyVPN ETH0-NM
如果unmanaged则NM一定不管理他们直接使用
设置交互模式下进行
防止非交互模式下输出的内容干扰SCP
对于VScode来说,如果使用主机复制的方式传输vscode-server,如何这个时候bashrc中存在其他的内容,那么这个内容就会影响到SCP的复制,导致vscode-server传输失败,所以为了避免这种情况,我们需要在bashrc的最前面加上这句
1 2 [ -z "$PS1 " ] && return
这个主要涉及到linux或者shell的两种交互模式
场景 :你本人坐在电脑前,或者通过 SSH 登录上去,看到了光标和提示符(如 user@host:~$),你输入一条命令,系统回你一条结果。
特点 :系统需要打印“欢迎信息”、“命令提示符”、“今日天气”等给人看的东西。
场景 :机器与机器对话。例如 VS Code 的后台程序去连接服务器、SCP 传输文件、或者你在本地运行 ssh user@host "ls -la"(只执行命令不登录)。
特点 :不需要提示符,不需要欢迎语。它只需要纯净的数据流 。
PS1 (Prompt String 1) 是 Linux 的环境变量,它定义了你的命令提示符 长什么样。